

I took delivery of a few 5×5 sheets of Baltic Birch and assorted hardware a few weeks ago and just completed construction of my dual workbenches. I’m a happy DIYer.
Why two workbenches?
My back and neck are happiest when I can sit at a workbench with the amplifier easel raising and angling a chassis so that I’m not leaning out over a project or having to reach too far. At the same, having space below a work surface for a stool reduces the amount of reinforcing structure you can practically include.
On the other hand, I need a sturdy bench for pounding, sanding, planing, sawing, etc. This requires a thick bench top or a frame that includes an apron running along the outside edges as well as stretchers tying the legs together. These extra structural bits impede on feet and space that could be used for rolling storage.
After trying to solve this trade-off for a while with differing designs of a single workbench, I gave up and just built two workbenches instead.
Both workbenches are along a ~10ft wall and just under 5ft long so that I could leave a gap between them to fit clamps, cords, etc. They are both 25″ deep and 36.5″ high and the rear edges rest on a horizontal ledger board lag bolted into the studs. They are made almost exclusively of Baltic Birch plywood and lots of Titebond.
The right workbench in the photo above is built with electronics and finer assembly work in mind. You can already see my amplifier easel in place, mounted on aluminum dowel so that it can swing up against the wall and free up the bench top. I have some common tools and wire already on the wall, but organization will be constantly evolving.
The electronics workbench is a double thickness plywood top mounted on some very beefy steel brackets from Rockler. The brackets are lag bolted into studs and I’m very comfortable with this setup for electronics and assembly. Best of all, I have maximum space underneath the bench for rolling storage, seating, feet, etc.
The left workbench is built with hand tools in mind. I loosely followed Paul Sellers’ plywood workbench design with laminated plywood legs and a tall front apron to resist racking. Unlike his workbench, I mounted mine on a ledger board in the rear, partly to keep it level with the sister bench and partly so that I could make use of the corner otherwise occupied by a sump system.
The hand tool workbench is secured to the back wall and ledger with steel angles so that I can remove it if ever needing to service the sump or change the room’s configuration. It will also have a vise mounted to the front right corner (on order). I’m happy with how immovable this bench is so far and plan to outfit it with some dog holes, etc over time. I haven’t decided yet how to make use of the wall space above the bench.
The rest of the room
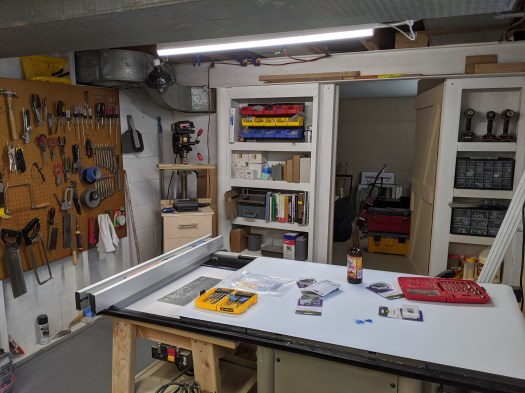
The room is divided by my table saw which does double duty as an assembly table and a place to put a beer (love this cool magnetic vinyl sheet to protect the top). You can also see my rolling router table under one wing of the saw. Beyond the saw at the wall opposite my workbenches, I have organization for parts and materials and a corner for my drill press.
I still need to come up with a storage solution for tubes. They are presently in a plastic drawer unit which is fine but getting old and starting to fall apart. There’s some potential space in the shelving areas or maybe a rolling cart with drawers that could stow under the electronics workbench. I’m still waiting for inspiration.
My old Craftsman 10″ swing drill press is happy on the rolling cart of drawers, but a upgrade is high up on my list of tool priorities. It works nicely in the corner though, so a floor-standing press may be too tight with the height restriction.
There’s work left to do as far as organizing and fitting in all my stuff and I’ll continue to post on shop doodads and projects, but this blog will return to actual tube projects shortly! I finally have a functional (and much improved) workshop again.


