
Here’s a quick and dirty guide for how to DIY a reasonably attractive chassis for a tube amp or preamp without expensive power tools. Even now that I’ve invested a bit in equipment, I still use a similar approach for many projects. There’s just something about the mix of nice wood grain with an oil finish, aluminum plate, and the glow of tube heaters that I find especially pleasing.
Cutting the wood skirt
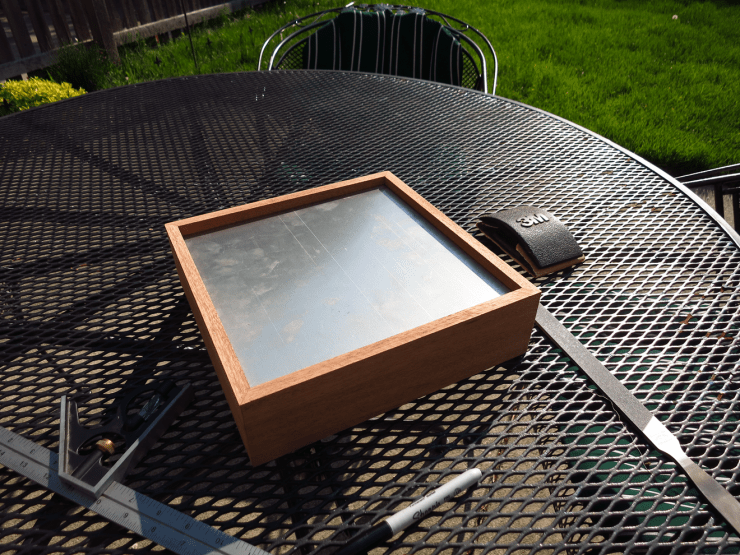
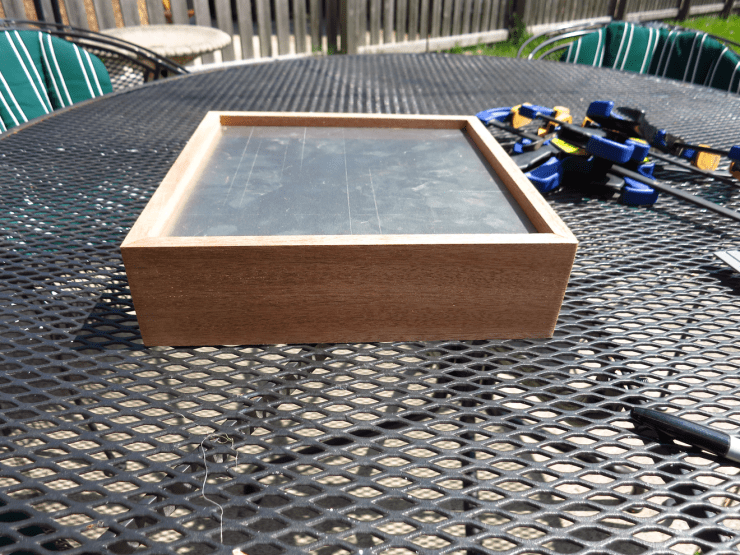
Here’s where you want to end up! 10″ x 10″ top panel with 3″ mahogany aprons. No finish on the wood or holes for parts yet, of course.
Tube amp chassis get pricey if you buy pre-made ones. If you absolutely need to hide some of the jacks or mount controls to the front of the amp, pre built chassis with aluminum front/back panels are great. When you can mount everything to the top of the amplifier/preamplifier though, it’s not hard to build your own for cheap without any power tools.
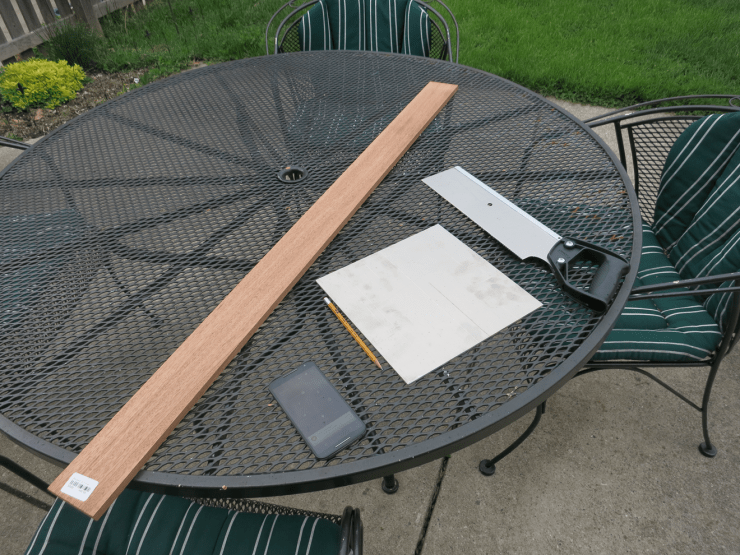
Materials needed:
- a piece of aluminum plate/sheet with square corners (I like 6061 aluminum in 1/8″ thickness)
- a piece of wood approximately 2-5″ wide and as long as the sum of the sides of your aluminum plus a few inches, about 1/2″ or 3/4″ thick should be good for most tube builds
- some extra wood scrap
- wood glue
Tools needed:
- miter box and saw
- sand paper and sanding block
- drill and various bits (for when actually putting holes in the plate for parts)
- ruler (optional, actually)
- decent work surface
- clamps (it helps to have right angle clamps, but not necessary)
- metal file (maybe)
You can bang this out in a day.
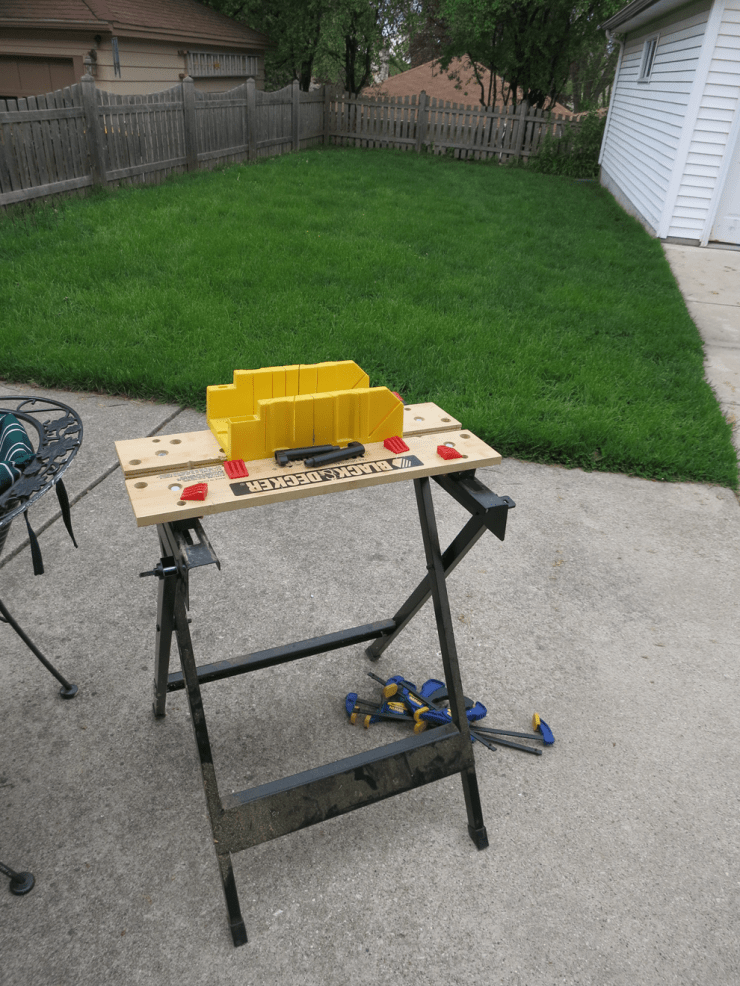
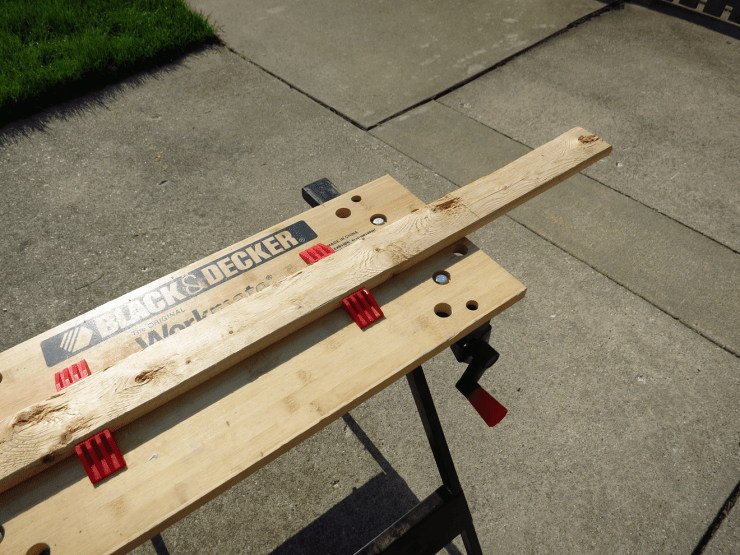
Here’s my miter box on my portable bench/vice thing. It’s a cheap miter box, but it works well enough for this kind of project. You should pay attention to the height of your miter box when buying wood for the apron. My box is only 3″ tall, so I don’t use wood wider than 3″ (though I could probably cut up to 5 or 6″ flat with the angled guides).
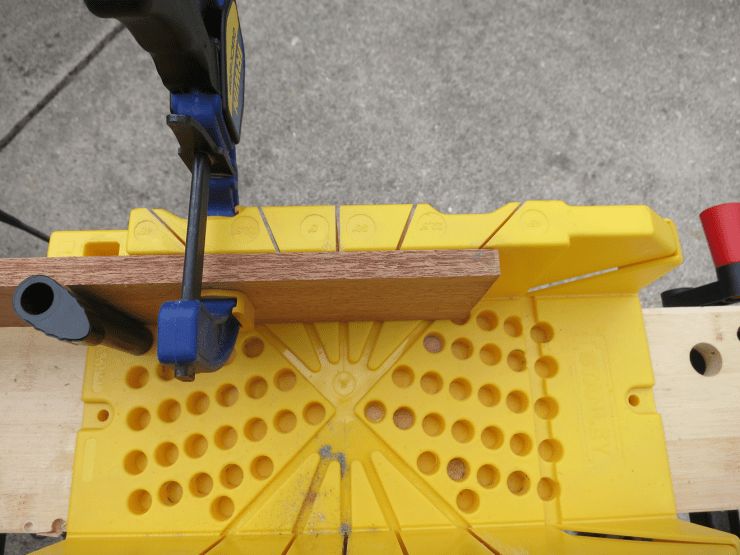
Just clamp the end of your board in and let it rip to start the first miter. Cut close to the end so that you don’t waste material, but not close enough that it just starts cracking and splintering apart. It’s important to be sure that your board is level in relation to the miter box at this point. A long board hanging off the end can cause you to cut at an angle and make an ugly joint later.

That’s a saw cutting wood.
After each cut, I use a pencil and the actual piece of aluminum I’m using to mark the length for the next bit. This is better than a ruler, in my experience. Because these are miters, you will be marking the ‘inside’ of the apron. Make sure you are marking on the correct side of the board and that your cut when it’s clamped in the box will hit this mark. Also make sure that you are cutting miters in the right ‘direction.’ I’ve wasted a lot of wood by getting distracted/impatient and not triple checking this.
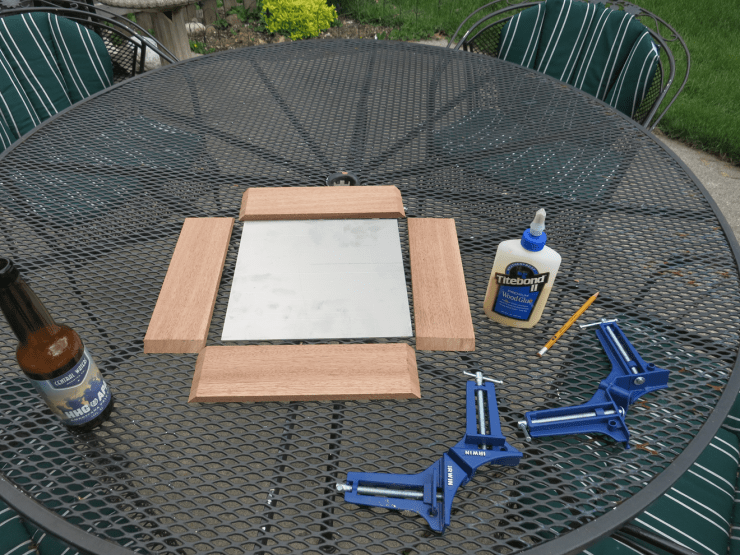
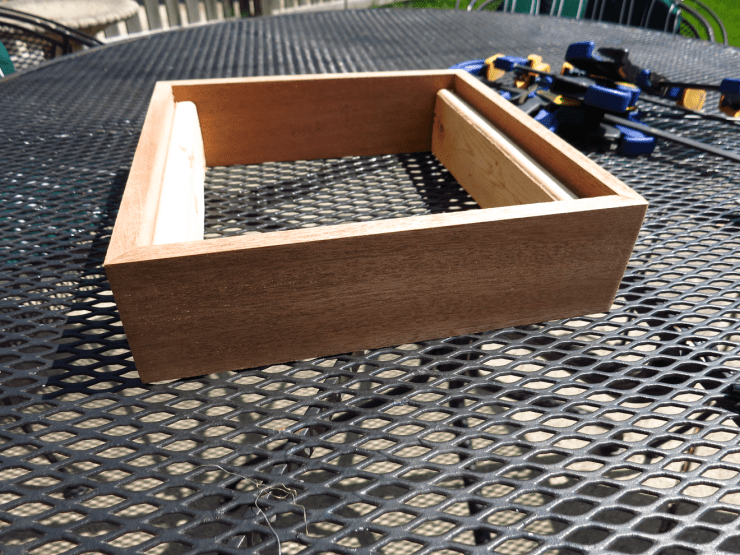
Boom. sides are cut. Pictured are some right angle clamps, glue, and go juice.
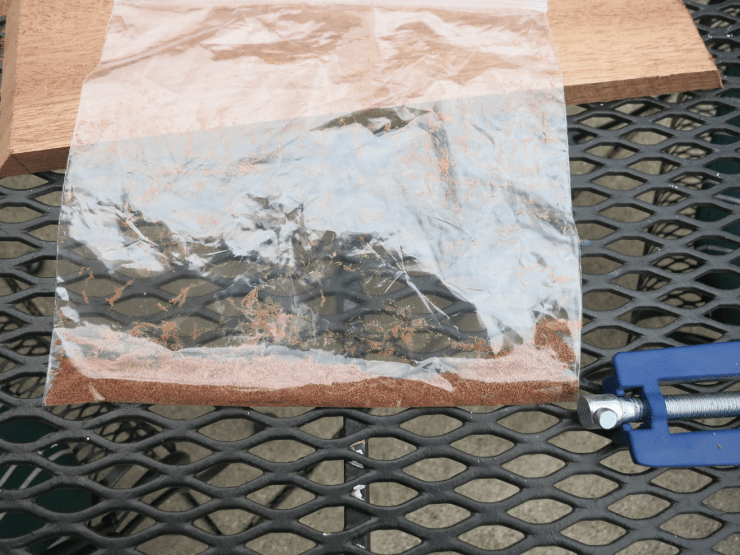
Once you’ve cut your sides, save some of the saw dust. If your box ends up with imperfect corners (as often happens), you can mix this with wood glue and use it as filler. Much easier than trying to get some color matched wood filler and it’s almost like recycling! Lay it in the gaps thick and sand off the excess once it’s dry.

Mock up your pieces with some clamps to be sure it will go together correctly. Sometimes I move sides around to try and find the tightest fit in the corners. Don’t worry too much if the miters aren’t perfect. Remember the sawdust trick.

Give the ends a good amount of glue because they’ll soak some of it up. I let the glue sit for 5 minutes to get tacky before clamping it together. Not pictured is my wife giving me the stink eye for doing this on the dining room table.

Here’s a corner. You can see that it isn’t perfect and that’s nothing to worry about. After the sides are all glued up, I’ll fill the little gaps with the sawdust and glue mixture and no one will ever know except you and me and the internet.
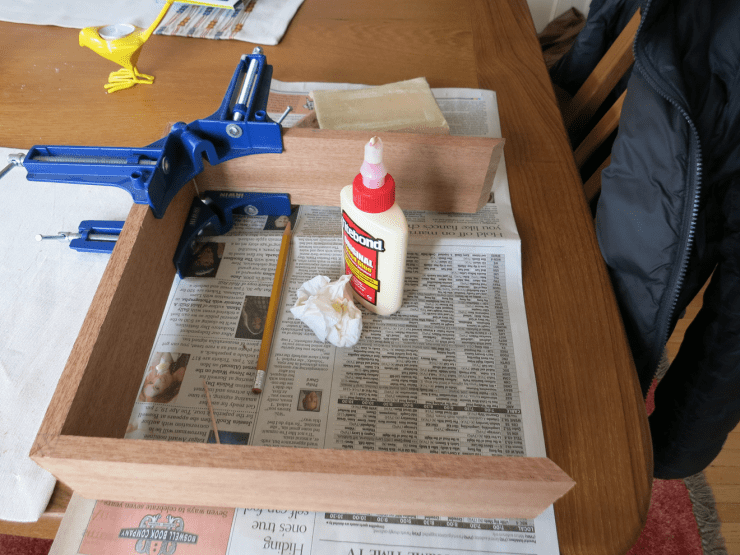
More gluing. I only have two right angle clamps, so I do it in stages. I need more clamps. Everybody always needs more clamps.

Last side getting glued on. Looks very box-like at this point.

So I didn’t really measure perfectly and the aluminum panel is a hair too wide at one end (you might also say I cut one side of the box a hair too narrow). There’s an easy fix for that though.
Also, dog butt.

Meet mister file. Mister file will gladly chew off a millimeter of aluminum and leave a clean edge.
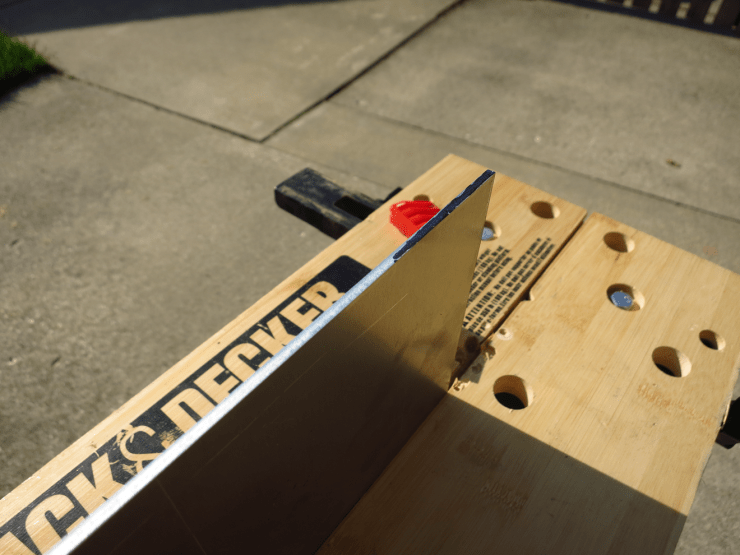
Here’s approximately where the plate is catching on the box’s edge. I mark it in Sharpie and then file until the Sharpie is gone. Test fit and repeat. I didn’t need to remove much material for it to fit.

It fits! Now we have to support the top panel.
This is scrap I had from some other project. It’s about the right size for this purpose. I’ve also used 1×1 and 2×1 cheap lumber. Just make sure you’ll have enough room to sink some screws through the aluminum top plate into this support. It’s best to screw across the grain instead of into end grain, though I’ve done both and lived. Tube amps don’t usually live in a high impact environment.
Supports cut! They don’t need to be a tight fit into the corners, they just have to offer enough support and give you something to screw into later.

Test fit of the top panel. These scraps leave a nice proportional lip for this project. If you use narrower scraps/lumber for the supports, you’ll need to make sure the lip is consistent and the top is level.

Glue those scraps in and clamp them. Dramatic lighting preferred.
And that’s pretty much that. I will still drill holes in the top for tubes, parts, etc, as well as holes to screw the top to the supports. Once I have made all my holes, I’ll sand the aluminum plate to give it a brushed finish (this piece is a bit scratched up).
Cutting tube socket and mounting holes in aluminum

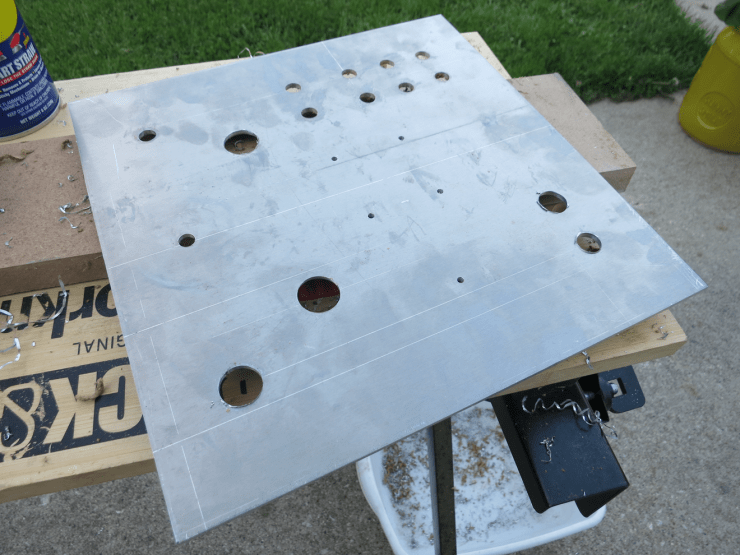
Here’s where we want to go.
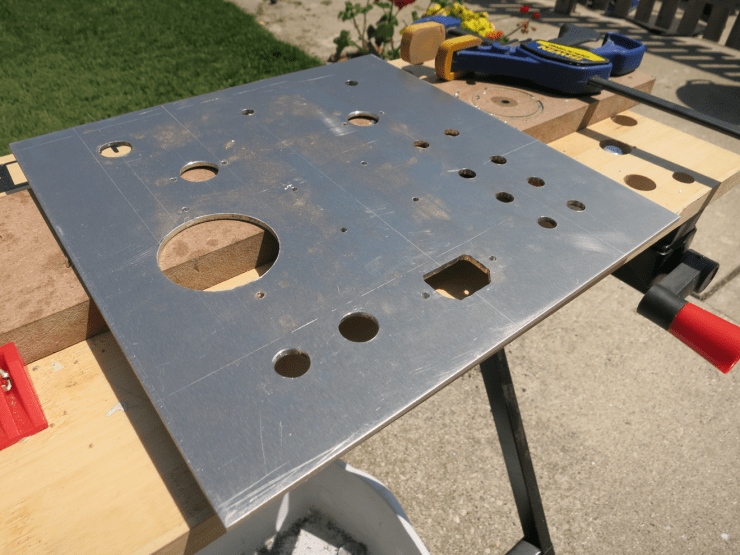
This is going to become a simple buffer preamp (the original Muchedumbre!). You can see the three inputs and one output on the left of the chassis. The shaft on the front left is a rotary switch to select input and the shaft in the middle is volume control.

Alright, so we have all our parts laid out on the 1/8″ aluminum plate. To do this, I used a Sharpie and a nice combination square (ruler with a 90 degree block thing on the end). I marked the bottom of the plate, so everything in this picture is actually the mirror of where I want it to be.
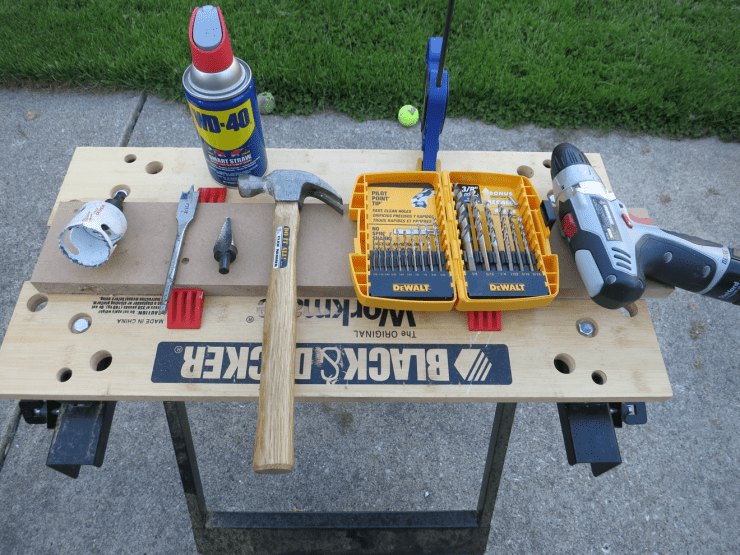
Your arsenal (left to right):
- Bimetal hole saw
- Spade bit (or anything spikey)
- Stepped bit * Hammer
- Assorted decent quality drill bits
- Drill (and keep a spare battery charging)
- WD40
- Clamps
- Work surface with some sacrificial scrap

Most importantly, wear your gosh darn safety glasses

Here’s my top plate again, all measured out with centers marked for the major parts.
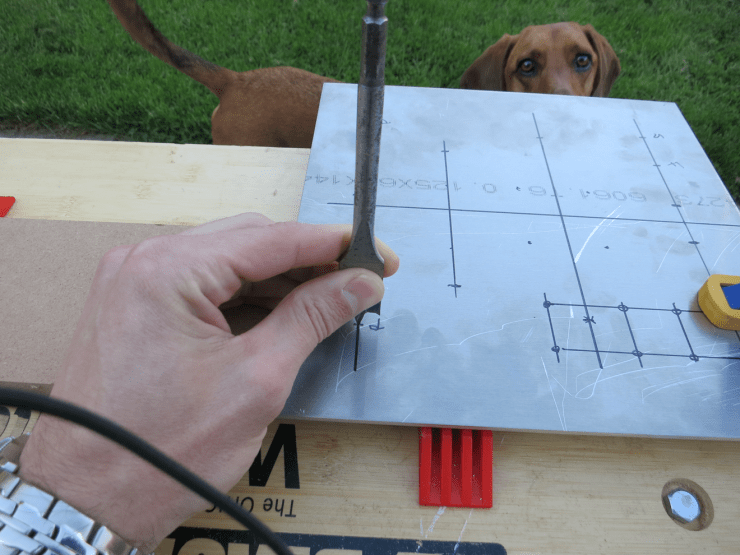
When I’m punching holes in aluminum, I use a spade bit and a hammer to create a nice divot for my small drill bits. Typically, I will begin the project by hammering the divot for all my holes first and then move on to drilling.
You don’t have to use a spade bit. You can use anything reasonably sharp and sturdy to mark your centers. This bit is worn out on the ‘wings’ but I can keep the point nice and sharp with a file. It’s great for this project.
Center the bit where you want the hole, smack it with a hammer, and give it a little twist to dig in and create a divot.
Dog is looking on and probably wondering why I’m building another tube project. He just doesn’t get it.

Then drill the crap out of the holes.
I start with a 1/8″ bit and drill everything with that first. I work my way up progressively with larger bits where they are needed. I like to use M3 or #4-40 mounting screws because I can get them with rounded allen heads (aesthetic choice) and 1/8″ holes work out perfectly.
If you use larger hardware, you may want to start with a slightly larger bit so that you don’t have to drill small mounting holes more than once.

Bam, them holes is drilled. This is a bit tedious, so it’s good to have some tunes and/or suds while working.
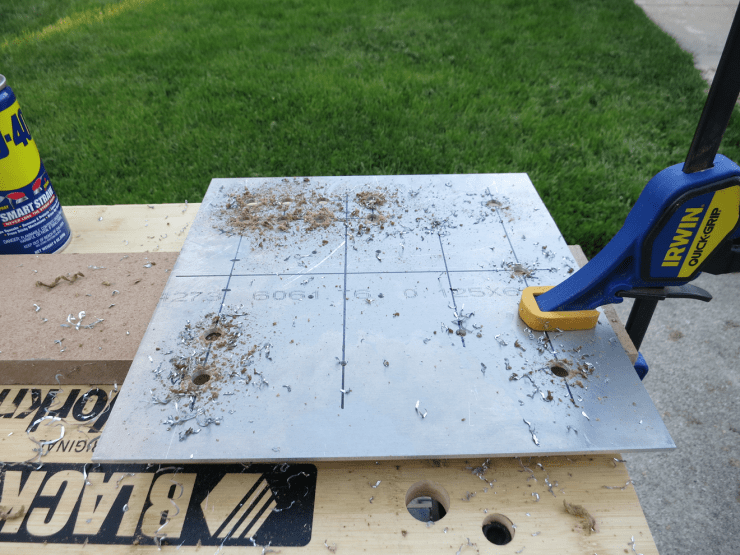
And here are the holes drilled that needed to be a little bigger. I always work my way up in bit size because I’ve found that the bigger bits usually want to wander more if you don’t have a smaller pilot to keep them centered.
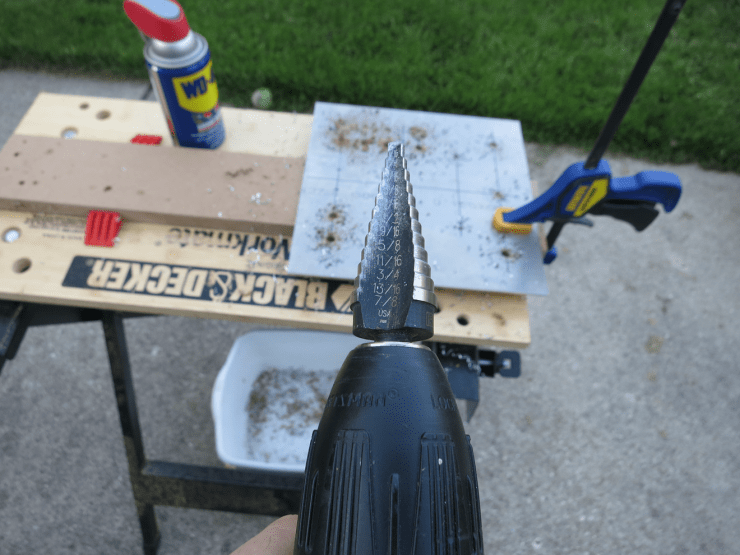
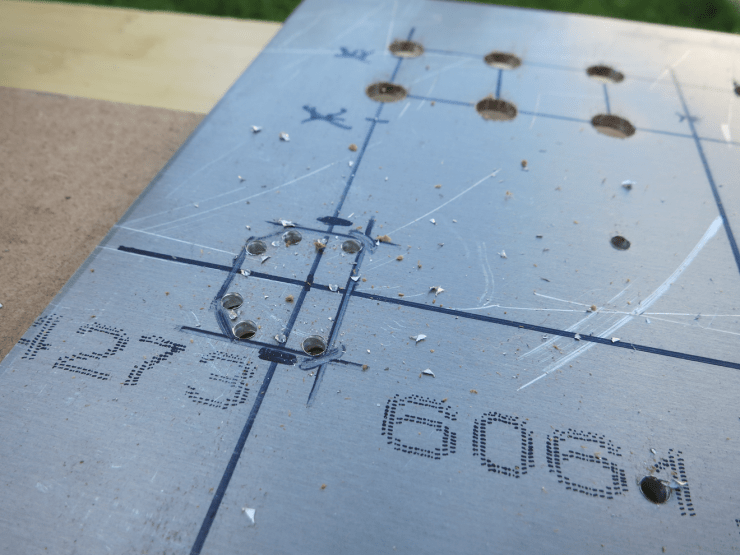
Now we’re going to drill the hole for a 9 pin tube socket. These need about a 3/4″ hole and I don’t have bits that big. Stepped unibit to the rescue.
At this point, I also give the plate a spritz of WD40 to help lubricate the bit. Pay attention while using one of these bits. It you lose track of what ‘step’ you’re on, it’s easy to overdrill and make the hole too big.
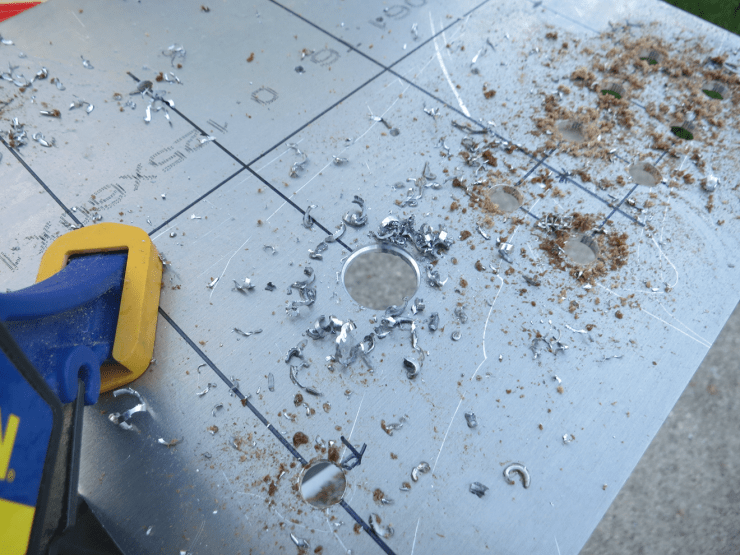
Yeah, that’s a 9 pin hole alright. Let’s do another.

Yeah, buddy!
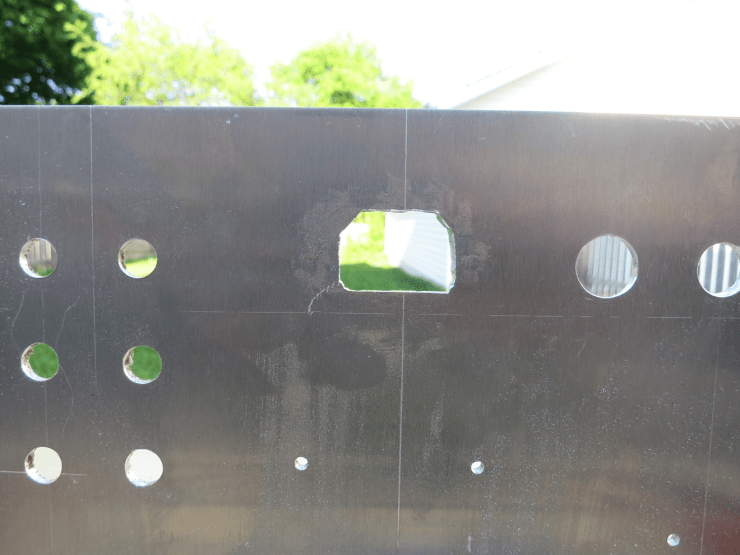
And a shot of the top of the plate. Next we’re doing the son of a bitch IEC socket hole.

Okay, outline of the socket mounting hole is marked. I hate these buggers. Many times I will mount them in the wooden apron because it’s a little easier to cut this weird shaped hole with a coping saw. But for science, I will demonstrate how to do it in aluminum.
I start by drilling at the corners with an 1/8″ bit. Make sure to drill inside the outline so that you don’t end up with visible gaps.

And then drill between the holes in the corners.

And then drill in between the in betweens. Do this for as long as you can because it means less clean up and removal later.

Ok, I’ve got a good number of holes started. Sometimes you can just tap the scrap out of the hole with a hammer. This time there is too much aluminum holding on, so I’ll connect the holes with a dremel cut off wheel. You remembered to wear your safety glasses, right?
ZZZZip. Here’s the rough hole. Of course the IEC doesn’t fit because the IEC standard is stupid. So I have the make the hole a bit wider and clean up the jagged corners.

For that, I have a nice assortment of persuasive files. Files are handy tools to have around, especially in weird shapes. That one that looks like some kind of curved dentist tool is indispensable for this kind of job.
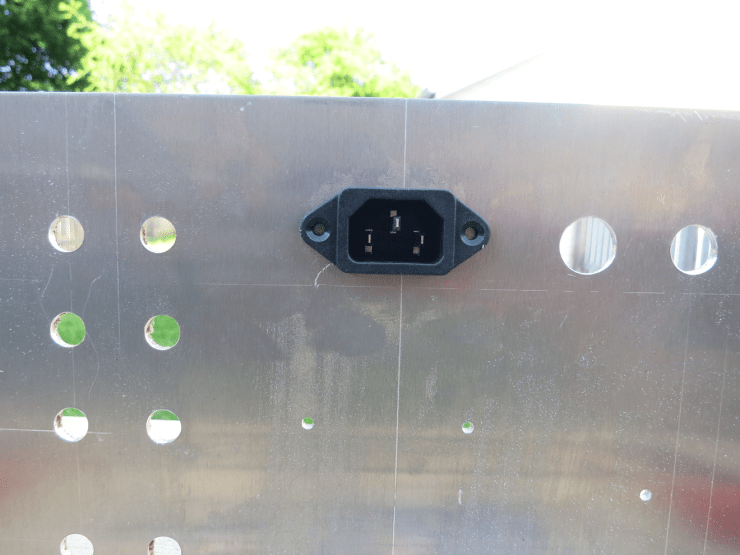
The IEC complies. Buy you some files. Seriously.

Ok, now I have to mount the big motor run capacitor (which certainly isn’t necessary, but it looks cool and means I can buy a new hole saw). I also use hole saws for octal sockets.
I really like these bimetal hole saws from Milwaukee tool. They’re called Hole Dozers. They do a much better job than the panel punches that I’ve used. Remember to use an arbor bit (barely visible here) so that you can keep this bad boy centered on the pilot hole you drilled earlier.

That’s the pilot hole that marks the center. Blast the plate with some WD40 and take it slow.
Depending on the size of the hole and how thick the aluminum is, you may have to stop midway and clear out the aluminum bits and reapply the WD40. Don’t worry, you’ll make it through eventually.

Nice, clean 2″ diameter hole. Bit messy. I keep a small tub under the work bench to knock aluminum shavings into.
If you own pets or if you like having feet that don’t bleed randomly, SWEEP UP AFTER YOURSELF. Aluminum shavings are sharp as hell and love to embed themselves is soft unsuspecting flesh.

Yeah, buddy. The motor run cap will be held from the under side with a couple of washers and bolts.
So after working on this top plate for a while, it’s scratched all to hell. You can tape up the plate with painter’s tape before drilling to prevent this in most cases. I’ve found that even if I try to protect the top of the plate, I still end up with scratches.

So, I give my plates a brushed finish with a random orbital sander. 80 grit will take out most scratches and leave a pretty nice finish. You can step up your grit as well and get a pretty good smooth finish if you want. Aluminum is soft though, so I avoid trying to make it look too smooth and perfect (saves me heartbreak when I scratch it later).
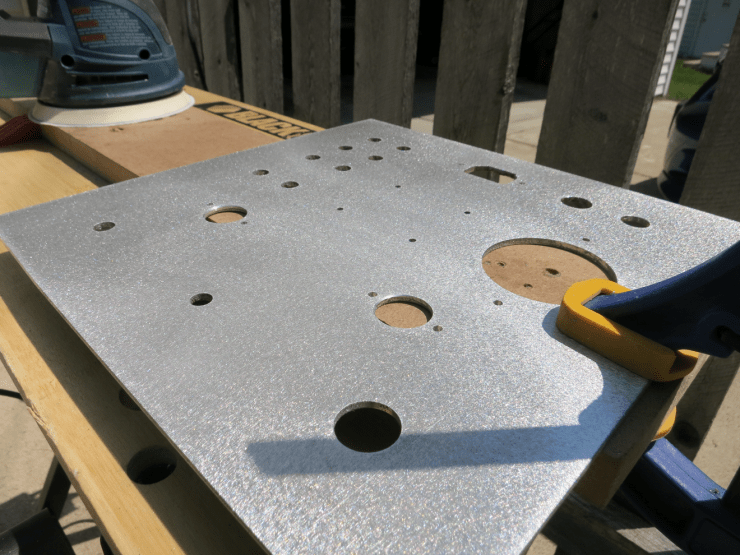
There you go. That was only 5 minutes or so with 80 grit. Utilitarian, but attractive.
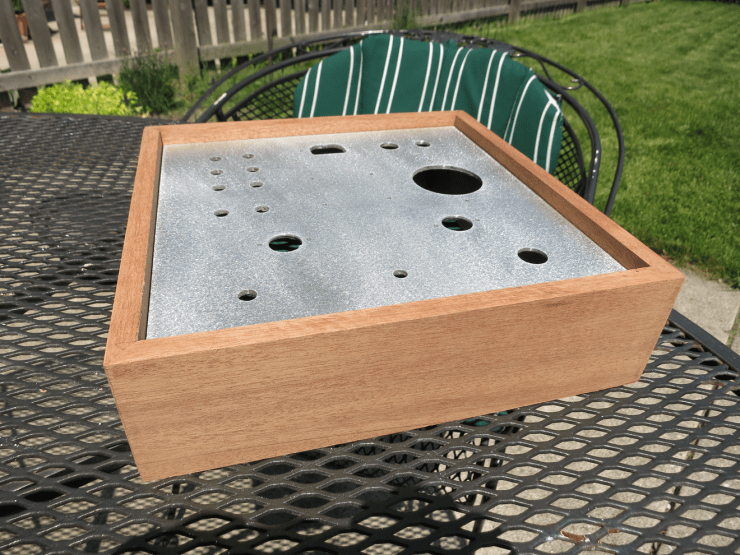
And back into the apron, ready for parts and wiring.
