Workshop Progress!

Lest anyone think I’ve abandoned the tube hobby, here’s some progress on getting the new workshop setup.

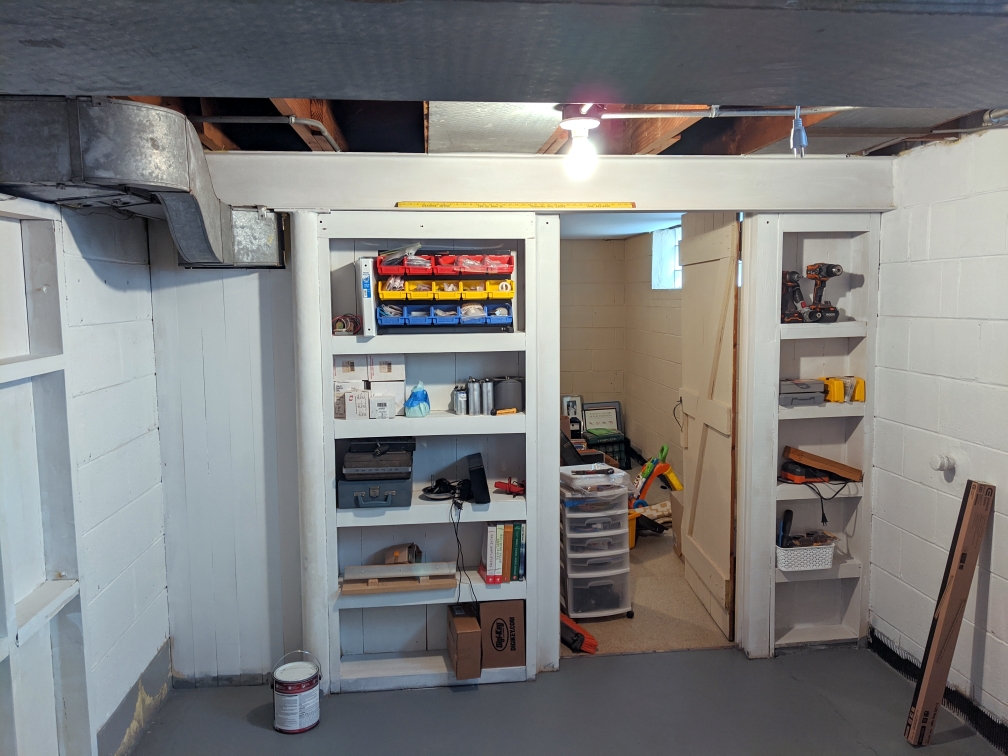
Here’s the before state of the workshop room (about 10ft x 15ft):

Some very interesting shades of yellow and beige going on in there. The perimeter had been excavated for a french drain before we purchased the house. Though other rooms in the basement had fresh paint and epoxy on the floor, this corner was pretty rough cosmetically.

First steps were to rip out some of the stuff hanging on the walls and ceiling. Then a deep cleaning, fresh Kilz on all wall surfaces and shelves, and finally a couple coats of floor epoxy to make sweeping up my messes (and finding dropped parts) easier. With the floor mopping and painting, it was stop-and-go work while things dried. I think that part is finally behind me.

Next steps will be to add more/better lighting, rip out the shelving perpendicular to the back wall (above), and frame it. I’ll add plywood over the framing to give me plenty of fixture options for tools and shelves. The workbench will also live along this wall so that I can reclaim some of the space in the sump and radon corner. This also lets me retain the full 10ft width of the shop in the rest of the space. That will be important for the woodworking tools.

The plan now is to have a single stationary electronics/assembly bench and everything else on casters so that I can configure the space for the given task at hand. Major woodworking tools in the room will be:

  • Miter saw station on cart with fold out supports
  • Drill press on cart with drawers
  • Router table, stows under electronics bench
  • Table saw, largish hybrid model (but I really wanted a cast iron top)

There’s big potential for saw dust in the small space, so I intend to add a dust collector eventually. This can live on the other side of one of the walls so that I can pipe a hose in when needed and save floor space. For the moment, I’m going to see how well a shop vac does with the relatively small pieces I usually work on.

Hopefully more updates after the coming weekend!

An Amplifier Primer: Technical Terms for Beginners (Headphonesty article)

Early tube computer modules with some of the female mathematicians and physicists who worked on the projects

I just finished an article for Headphonesty on headphone amplifier basic terms. It focuses on building block concepts and aims to make technical marketing copy more comprehensible by users without an electronics background.

Here are the topics covered:

  • Single-ended and push-pull
  • Classes of amplification (A, B, AB)
  • Output coupling methods (direct, capacitor, transformer)
  • Amplifying devices (tubes, transistors, ICs)
  • Negative feedback

This article is probably a good introduction to articles on WTF Amps like the Output Stages page or the various headphone amplifier projects.

Read An Amplifier Primer on Headphonesty here!

A Mighty Cacahuate caught in the wild

Student “D” sent me some pictures of his Mighty Cacahuate project with a twist and it’s too unique not to share. D developed a PCB for his build and mounted all the amplifier parts to a top plate as would usually be done. Instead of a boring wooden box, D dropped this into a boombox enclosure for all-in-one listening. I love to see the creative use of a basic schematic I posted here on my little website.

We initially troubleshooted some wiring over email, mostly due to my omission of the details of heater wiring and pin numbers on the original schematic. Once sorted though, D says the amp started playing and sounding great without a hitch.

It was an amazing feeling the first time they powered on.

-D

Careful there, D, that feeling is habit forming!

Update on the mono-blocks: left channel is done and right channel is coming together quickly. Write-up for the project is also underway. Looking forward to playing in stereo!

EL34 tester tubes, also considering springing for KT88s on this project
Night shot. Red glow through the vents is LEDs used as voltage references in CCSs inside.

Walking the line

When I got started with woodworking and amp building, cutting a straight line was the most intimidating part of just about any project. Not having the space or justification for a table saw, I tried more than one way of following a line with a jig saw and circular saw before I found something that works for me. Now I do not shy away from ripping boards to specific widths quickly and it only took some scrap and ingenuity.

What I found was a really simple circular saw jig made of a three or four inch wide 3/4″ board and some ten or twelve inch wide 1/8″ sheet. If you can find a board with a straight edge (preferably machined right from the lumber yard), you can cut a straight line. The jig is simply the 3/4″ board glued to the overly-wide thin sheet. You then zip your circular saw down the board with the shoe pressed against the straight edge to cut off the excess 1/8″ material. Viola. You now have a jig that will always cut just as straight as the board you used to build it.

saw jig

Here’s a picture of my jig (rebuilt this weekend because the old one was getting chewed up):

IMG_20170530_192959089
My board is a bit wider because I also use this with my router for insetting panels.

To use the jig, I mark the piece that will be ripped or cross cut in two places and then connect the dots with the now arrow-straight edge of the 1/8″ jig base. Clamp it down and then let the circular saw ride against the thick portion of the jig. Because the saw’s shoe doesn’t change width, it will always faithfully cut along the edge of the 1/8″ material, provided you are making sure it is following snug against the thicker board. Straight cuts don’t get easier than this and I’d wager that this is at least as fast as setting up a table saw for every cut.

As far as measuring, I’ve always got a combination square near at hand (great for marking holes in top plates, too). This makes setting a repeatable distance from an edge quick and easy.

IMG_20170530_192910549

If the thought of table saws and messy cuts prevents you from tackling your next amplifier or speaker project, hit the bargain bin at the lumber yard and whip up a simple jig.  This hobby doesn’t require expensive equipment if you get clever with the tools on hand.