Line stage + phono build underway

In a recent post I set a goal for myself of creating a couple of preamp designs that included both line stage and phono preamp circuits. The first of these builds is now underway! Because of the number of input and output jacks as well as switching and volume controls, I’m using a different style chassis than the all-wood apron approach in most of my builds. The face plate and rear of this enclosure are aluminum with wood (walnut here) used as accent panels on the sides.

I’m emphasizing the sleeker look by mounting all of the transformers inside the chassis. The power supply is mounted to a section of aluminum c channel that also serves to section off all of the AC power from the rest of the chassis (which will carry sensitive signal circuits). So far so good. We’ll know if the approach to shielding and layout is effective once it’s powered up and playing. Placement for the signal portion will be finalized after I’ve mounted the front panel controls into the 3/8″ aluminum flat. I expect that to be a bit of an adventure…

The generic circuit for this build is below (final values will be published once it’s tested). Tracing the path of a phono signal: the resistor loaded input stage feeds the RIAA correction filter which feeds a gyrator loaded output stage. I’m using a gyrator as a flexible load to allow for tube swapping as well as a low output impedance device to effectively drive the follow control that follows after the selector switch. The volume control feeds a transformer loaded 6H30.

The Edcor GXSE 15k:600 output transformers are an experiment here. Reading through others’ experiences and measurements, I think the 6H30 is going to be a suitable driver with good bandwidth if it’s given enough current. I expect to do some experimenting with loading the secondary.

All in all, this will be all 9-pin current production tubes and parts. If the execution works out as well in real life as it does on paper, it will be a great, relatively-affordable preamp build.

New page: gyrators

Ok, so what we often call a gyrator is not technically a gyrator. This page is named after the circuit popularly referred to as a gyrator, not an actual gyrator.

I’m developing a little PCB for a simple gyrator circuit to be used in an upcoming integrated preamp project (2nd stage of phono circuit: needs gain and low enough output impedance to drive a volume pot). The thing that’s most intriguing to me at this point is how a gyrator lets you set an anode voltage rather than anode current (but still maintains a high impedance for AC). On paper, this looks more flexible in rolling compatible pinout tubes than setting a current. And what the heck, it’s a new circuit to try!

See the new page here!

Stacked SMPS PSU for tubes

I used a 48V switch mode power supply in the El Estudiante headphone amp and am pleasantly surprised with the quiet background and relative simplicity. When it comes to higher voltages though, you will not find many AC/DC switch mode power supplies at vendors like Mouser or Digikey. While a beefy low voltage DC supply could feed a DC/DC booster (see Millet’s 10W booster project and various eBay listings), I’d like to find something that is more easily repeated by others with parts from major PSU manufacturers.

I came across the idea of stacking low voltage SMPS supplies in a couple places and the idea intrigued me as a scalable and affordable approach to creating B+ (see here and here). The Meanwell EPS-15 48 are regulated and isolated AC/DC supplies that sell for about $8. Stacking six of these would supply 300mA at about 300V.

This schematic shows the general outline of what I’d like to try with a single-ended amplifier. The V1 supplies produce the anode to cathode voltage for the output tube. These are referenced about 100V above ground by the V2 supplies. The input tube’s B+ is a combination of the V2 and V3 supplies. All in all, this would call for seven 48V supplies, plus another low voltage supply for heaters. The final cost would be somewhat less than a traditional transformer and CLC filter, but there are more interesting reasons to try this.

All the supply gymnastics make it very easy to direct couple the two stages. In this example, Q1 is a gyrator load and Q2 sets the reference voltage. This would also allow us to drive the output tube into A2 operation. My choice for output tube here would be a 6V6: a really sweet sounding triode that otherwise doesn’t produce much in A1 operation. Power would still be low (around 2W), but that would be plenty for headphones or enough for high-efficiency speaker systems.

DIY DHT filament strategies

Having a small stash of #26 tubes and always being curious about it as a preamp tube, I’ve embarked on some preliminary research of successful implementations. There’s a huge thread on diyaudio.com, but some choice references are Ale Moglia’s iterations and Kevin Kennedy’s classic implementation.

In general, the prototypical 26 preamp is a fairly simple single tube grounded cathode gain stage. Perhaps this topology simplicity is why there is so much experimentation in the support circuits. Gyrators, current sources, and line output transformers all make an appearance as the anode loading strategy. The B+ supply is similarly diverse: SS regulators, tube regulators, VR tubes, etc. It seems the popular consensus is for fixed bias: using the filament current drop across a resistor to set the cathode current. But there are fixed bias and traditional cathode bias implementations as well.

All of the above is fairly comfortable stuff coming from the general tube world of 9 pins and octals. The filament (AKA heater) supply, on the other hand, is something new for those used to indirectly heated tubes. In indirectly heated tubes, the cathode is a sleeve surrounding the filament heating it; this mechanical separation helps prevent heater hum (50hz or 60hz AC) from entering through the cathode. In a directly heated tube, on the other hand, the filament and the cathode are one and the same.

Depending on the circuit, AC filament power with balancing resistors and/or a ‘humdinger’ pot may be enough for an acceptable hum level. With the higher Mu (8-9) of a #26 and the need to keep front end noise/hum to a minimum (because it will only be amplified by everything following it), a DC heater solution is in order. We are looking at a requirement of about 1A at 1.5V for a #26 tube. The general approaches I have found are:

A low voltage SMPS and a dropping resistor requires no explanation if you know Ohm’s Law and can find something quiet with the right ratings (here’s a good read on this topic). Voltage regulation and current sources/sinks have been covered in principle a few times in projects and general information pages as well (see links above). Mixed strategies are what have piqued my interest the most.

Kevin Kennedy’s article suggests a 7805 followed by a LDO CCS to supply #26 filaments. From what I can gather, this is the principle also behind the Ronan Regulator (which I see mentioned frequently but I can’t seem to find the ‘official’ schematic). In these strategies the voltage regulator makes a first pass at cleaning up the raw DC and absorbs some power dissipation. The constant current source follows and sets the filament current to a fixed value (in turn setting filament voltage as per Ohm’s Law). Including a CCS to limit current has a protective side-effect as well: cold filaments are otherwise eager to soak up a lot of current, potentially stressing the power supply and filament/cathode itself.

Rod Coleman also has a very interesting approach to DHT filament regulation. You can find boards/kits for sale here (no commercial interest, just admiration for the design).

coleman regulator

This circuit feeds the filament from the ‘positive’ end with a gyrator, also known as a cap multiplier in this configuration. The transistor Darlington pair sees a low-passed capacitor at its base and works to amplify this smoothed signal at its low impedance emitter (effectively making the cap seem much bigger than it really is). This doesn’t regulate voltage because the gyrator doesn’t have a fixed reference, but it does reduce ripple drastically.

The ‘negative’ end of the filament is connected to a constant current sink. This is a ring-of-two CCS design which will have a lower operating voltage requirement than a cascode CCS or many ICs. Because our current is relatively high, low dropout voltage is a benefit in reducing overall power dissipation.

The filament is fed a low ripple voltage with a CCS setting the current. It’s simple, but reports seem universally positive for Coleman’s regulator approach. Whether filament bias or cathode bias, the filament supply should be left floating (it finds ground through the bias resistor or grounded cathode).

There’s little reason to reinvent the wheel here as far as I can tell. Although I’m still casually reading, I’ll more than likely try one or more of the above approaches to powering the filaments in my upcoming #26 project. More to come on this project as parts arrive and the ideas ferment.

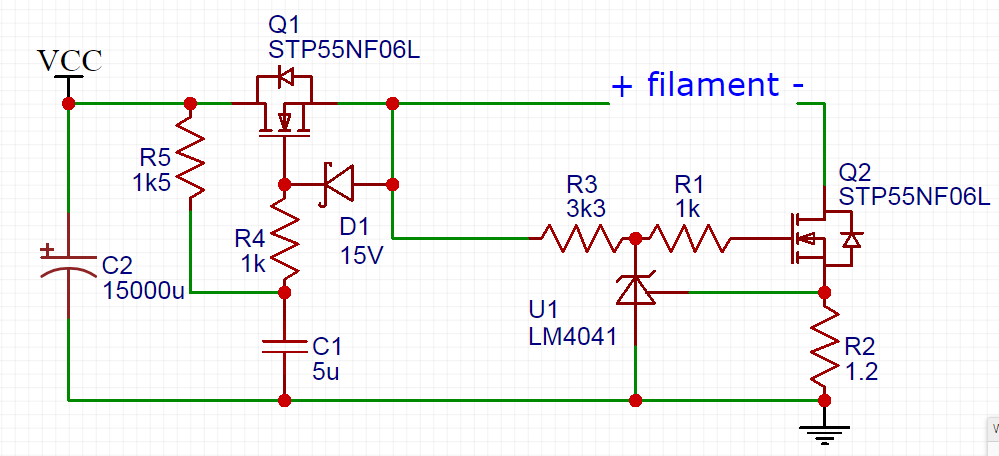
P.S. here’s a FET version of the same gyrator-CCS one-two punch:

FET filament reg