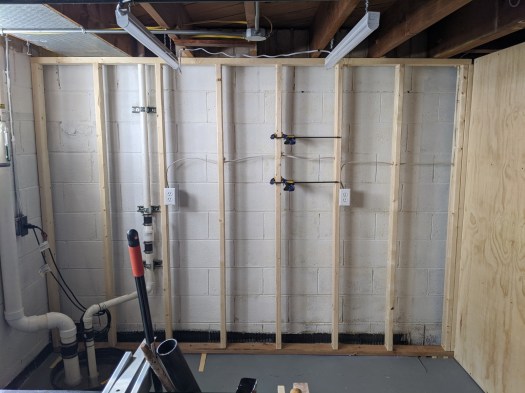
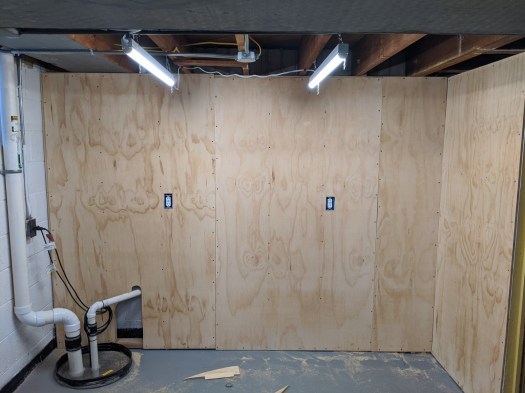
I’ve made more progress on the workshop room where my little tube hobby shop will soon live. Since the last post, I’ve ripped out a section of built-in shelving, framed the rear wall, had electrical installed, and covered said framed wall with 1/2″ plywood.
This plywood wall will eventually house a workbench for electronics and assembly as well as shelving (potentially a french-cleat type solution). The rest of the room is also taking shape with the addition of a small cart for my drill press and a section of peg board for hanging hand tools.
I still have plenty to do, but with a non-zero chance of a coronavirus quarantine, it’s very possible I’ll be spending more time in the tube bunker than expected. Next order of business is to build some drawers for the press stand and the workbench itself. When that is done, I’ll feel much more settled in the new space.
Lest anyone think I’ve abandoned the tube hobby, here’s some progress on getting the new workshop setup.
Here’s the before state of the workshop room (about 10ft x 15ft):
Some very interesting shades of yellow and beige going on in there. The perimeter had been excavated for a french drain before we purchased the house. Though other rooms in the basement had fresh paint and epoxy on the floor, this corner was pretty rough cosmetically.
First steps were to rip out some of the stuff hanging on the walls and ceiling. Then a deep cleaning, fresh Kilz on all wall surfaces and shelves, and finally a couple coats of floor epoxy to make sweeping up my messes (and finding dropped parts) easier. With the floor mopping and painting, it was stop-and-go work while things dried. I think that part is finally behind me.
Next steps will be to add more/better lighting, rip out the shelving perpendicular to the back wall (above), and frame it. I’ll add plywood over the framing to give me plenty of fixture options for tools and shelves. The workbench will also live along this wall so that I can reclaim some of the space in the sump and radon corner. This also lets me retain the full 10ft width of the shop in the rest of the space. That will be important for the woodworking tools.
The plan now is to have a single stationary electronics/assembly bench and everything else on casters so that I can configure the space for the given task at hand. Major woodworking tools in the room will be:
Miter saw station on cart with fold out supports
Drill press on cart with drawers
Router table, stows under electronics bench
Table saw, largish hybrid model (but I really wanted a cast iron top)
There’s big potential for saw dust in the small space, so I intend to add a dust collector eventually. This can live on the other side of one of the walls so that I can pipe a hose in when needed and save floor space. For the moment, I’m going to see how well a shop vac does with the relatively small pieces I usually work on.
Although all my parts and most of my tools are still in boxes, my household move is complete! It will still be a while before I’m spending free time in the workshop, but it’s never too early to daydream a bit about how I’ll set things up.
I have a blank slate of dry, mostly bare, concrete and studs/joists to work with. Aside from a sump in the corner, I’ll be able to utilize all 15ft x 10ft for my own storage and working space. Coming from space that was split between a garage and a shared basement, the 150 sqft is palatial. That said, my goal is to use it as efficiently as possible.
Amp Work Zones
Taking a cue from kitchen design, I’m planning the room layout by functional zones. Specifically, building tube amps involves three key processes: chassis work, electronics work, and parts/materials storage. Each process is a Russian nesting doll of other steps and tasks, of course, but these three general areas represent unique workflow challenges that are more or less shared by the sub-tasks that make them up.
Chassis Work
Messy in terms of generating dust, shavings, waste
Space has high potential to be used in non-hobby activities
The woodworking-focused area would benefit from mobility. Rooms adjacent to the workshop can be used as ad-hoc work space for projects that don’t fit in the smaller shop. Keeping tools and workbenches on casters will also let me rearrange as the work or materials require. Additionally, being able to moves benches helps with dust cleanup.
The old chassis work space
This will probably involve a 8ft+ bench for assembly with an integrated miter saw bay. Space under the bench will house a shop vac (dust control) and extra power tools and tool boxes. My drill press will live on a separate cart, as will my router table, for maximal flexibility.
I need to figure out a good way to deal with casters and the unevenness of basement floors.
Electronics Work
Benefits from flexibility in lighting and seated/standing work
Equipment is stationary and shelf size, but numerous
Results in many small parts used simultaneously
I’m planning to reuse the t-track chassis cradle I had in my last workbench. This was one of the best ‘tricks’ I picked up for building and working on projects. The rest of the space above the workbench will also be very valuable to keep power supplies, variacs, and equipment close at hand while working on a project. The worktop itself should have some kind of padding.
A project on the “easel”
This will likely also be about an 8ft long bench. I do not see a lot of benefit in making this a mobile bench due to its specialized nature and the manageable size of projects. Owning a CNC is one of my long-term hobby goals, so the extra long bench may come in handy (though it kind of breaks the ‘zone’ philosophy).
I’d like to come up with some kind of solution for keeping component parts organized while they’re out and being used for a build. This could be as simple as having tackle-box organizers on hand.
Parts and Materials Storage
Materials typically include long lumber and extrusions and plate under 18″ square
Component parts are numerous, but physically small and commodities
Tubes and transformers vary widely and some are fragile/valuable
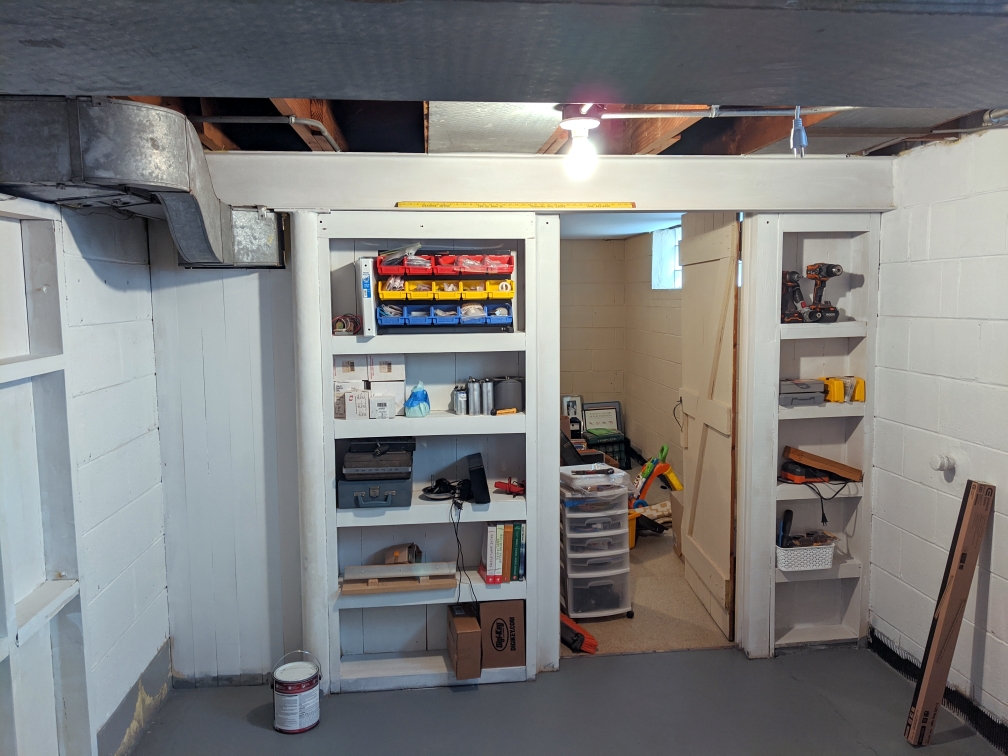
The space has shelving built between studs that will help with storage for some things (mostly paint cans at the moment). Storing long materials high on the wall in a rack makes sense. Aluminum plate could be stored on edge without worrying about it deforming. The numerous component parts, tubes, and transformers, present an interesting challenge though.
In the past I’ve kept tubes in Rubbermaid drawers, but I’ve found that I’ll often forget about what I actually have on hand. Curing that will probably require some way of organizing tubes in a single layer, preferably vertically to conserve floor space. I have had my eye on french cleat style storage walls and am thinking about ways to adapt this to small parts and tubes. The modular nature of it has some potential benefits.
First things first
Before I start cutting too much wood for benches and storage, I plan to give the whole room a good scrubbing and a fresh coat of paint. Other rooms in the new basement have a coat of epoxy that I find to be very appealing, so I will likely treat the floor to make it easier to clean and generally more attractive. I’ll also switch out the bare bulb light fixtures to shop lights and have some additional outlets put in on their own circuit.
Yes, there’s lots to do in the new workshop! I plan on building a simple tube project or two in the meantime. Refreshing my memory of what it’s like to start out without a bunch of tools is probably a great exercise in and of itself!
I recently spent some time in the garage workshop on a non-tube project I’ve been meaning to do for quite some time. Up to now, my chassis have all been a mitered box with a lip to inset the top and bottom plates. I cut the lip with a straight edge and a hand-held router. This works fine and produces good results, but setting it up for the cuts was a chore. The better solution for this kind of rabbet with a fixed width/depth is a router table, so that’s what I built!
My new table includes a white-board top, inset aluminum plate for the router, and t-track to adjust the fence distance. The fence has adjustable stops so I can get close to zero clearance and add shims to plane edges or remove small amounts of width from boards. This will all make cutting the same chassis I’ve been doing much quicker. It also opens up some new chassis possibilities:
Here’s a different style chassis that I’ll use in the next preamp build. The sides are still wood and include a lip to inset the top and bottom, but the front plate is 1/4″ aluminum and the back is an aluminum c channel. This will make drilling for jacks and controls much easier than using a 3/4″ wood panel. Making the same enclosure with decent precision would have been much more difficult without the new router table.
More updates to come as I begin this preamp project!
I wanted a better way to wire my amps and had been lusting after Decware’s amazing assembly room for a while. While I can’t afford the custom extrusions and equipment that Decware has, I can get creative with common materials. I decided to try a simple easel based on a couple of rails of t track and some standard angle and rod extrusion.
The basis of my easel is two 2ft sections of t track. Finding a 4ft section with bolts and knobs on sale at Rockler was what pushed me over the edge to build this daydream. The t track is 3/4″ wide by 3/8″ deep. Rather than trying to route a channel in a thick board, I sandwiched the t track in scrap with 3/4″ thick scrap under the track and 3/8″ to form the outside. These were glued and clamped face down so that I could be sure the t track would be flush with the top edge.
My bench is cantilevered from basement joists with 2×6 vertical supports. I ran a 1/2 aluminum rod between the supports to provide lateral movement and adjustment to the t track rails. The rails simply have a 1/2″ hole through which the rod passes. By mounting the rod 12″ from the surface, the 24″ rails give a 30 degree angle. This leaves plenty of clearance for transformers and is comfortable to work on while standing or sitting). I purchased some 1/2″ washers and collars, but they may not really be necessary (I’ll find a use eventually).
My horizontal ledges are 1/2″ by 3/4″ aluminum angle (3/4″ side is flat against the t track rails). I used self adhesive cork sheet to protect plates in the easel from scratching on the support. Depending on your knobs or wing nuts, you may have to trim some of the horizontal rails so that they can be completely tightened. I cut my rails to fit a 18″ wide top plate, but aluminum extrusion is cheap if I ever want to build something wider.
All in all, this is a handy and relatively simple addition to my tube amp building bench. And it is a lot cheaper than custom extrusions or lab fixtures!
When I got started with woodworking and amp building, cutting a straight line was the most intimidating part of just about any project. Not having the space or justification for a table saw, I tried more than one way of following a line with a jig saw and circular saw before I found something that works for me. Now I do not shy away from ripping boards to specific widths quickly and it only took some scrap and ingenuity.
What I found was a really simple circular saw jig made of a three or four inch wide 3/4″ board and some ten or twelve inch wide 1/8″ sheet. If you can find a board with a straight edge (preferably machined right from the lumber yard), you can cut a straight line. The jig is simply the 3/4″ board glued to the overly-wide thin sheet. You then zip your circular saw down the board with the shoe pressed against the straight edge to cut off the excess 1/8″ material. Viola. You now have a jig that will always cut just as straight as the board you used to build it.
Here’s a picture of my jig (rebuilt this weekend because the old one was getting chewed up):
My board is a bit wider because I also use this with my router for insetting panels.
To use the jig, I mark the piece that will be ripped or cross cut in two places and then connect the dots with the now arrow-straight edge of the 1/8″ jig base. Clamp it down and then let the circular saw ride against the thick portion of the jig. Because the saw’s shoe doesn’t change width, it will always faithfully cut along the edge of the 1/8″ material, provided you are making sure it is following snug against the thicker board. Straight cuts don’t get easier than this and I’d wager that this is at least as fast as setting up a table saw for every cut.
As far as measuring, I’ve always got a combination square near at hand (great for marking holes in top plates, too). This makes setting a repeatable distance from an edge quick and easy.
If the thought of table saws and messy cuts prevents you from tackling your next amplifier or speaker project, hit the bargain bin at the lumber yard and whip up a simple jig. This hobby doesn’t require expensive equipment if you get clever with the tools on hand.